
Key Words: Silicon Wafer Dicing PCB Depaneling Glass Cutting
Home > News > Company News
【Description】:
A comprehensive guide to diagnosing and fixing continuous water chiller alarms in laser equipment, covering reservoir levels, bypass tests, and heat dissipation.
In laser micromachining systems, the water chiller is an essential but often overlooked subsystem. The laser source generates significant heat during operation, and without consistent cooling, performance degrades rapidly. Wavelength stability shifts, output power drops, and in extreme cases, the laser gain medium or optics can suffer permanent damage.
When the chiller emits a continuous audible alarm without displaying a specific error code, the operator has no clear diagnostic pointer. This situation is frustrating but entirely manageable. Field experience across thousands of installed systems shows that the alarm almost always originates from one of three conditions: low water level, restricted water circulation, or inadequate heat dissipation. A systematic approach, starting with the simplest checks, typically resolves the issue without replacing any components.
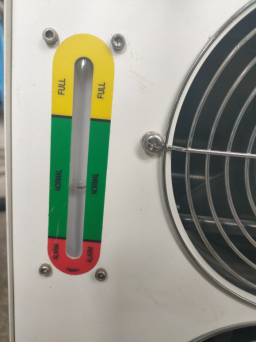
The chiller's reservoir has a clearly marked green zone indicating the optimal operating range. The water level should be maintained within this band at all times.
The water pump draws coolant from the reservoir. If the level falls below the minimum mark, the pump may draw air instead of water, leading to cavitation, reduced flow, and intermittent cooling. The chiller's low‑level sensor triggers the audible alarm to prevent pump damage and inadequate cooling.
What to check:
Open the reservoir cap and visually inspect the water level against the green zone markings.
If the level is low, top up with distilled or deionized water—never tap water (see note on water quality below).
After refilling, power cycle the chiller to reset the alarm. If the alarm ceases, the issue is resolved.
In production environments with high ambient temperatures, water evaporation is normal. A weekly level check is recommended as part of routine maintenance.
If the water level is correct but the alarm persists, the next step is to determine whether the coolant is actually circulating through the laser head. The most effective method is a bypass test.
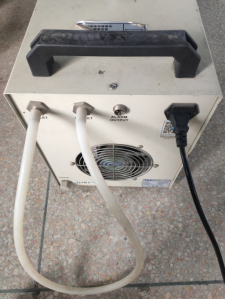
Procedure:
Turn off the chiller and disconnect the two water hoses from the laser device (the inlet and outlet lines).
Connect the chiller's outlet port directly to its inlet port using a short piece of hose, forming a closed loop that bypasses the laser completely.
Turn the chiller back on and observe the alarm status.
| Alarm Status | Diagnosis | Action Required |
|---|---|---|
| Alarm stops | The chiller and pump are functioning normally; a blockage exists in the water line between the chiller and the laser head. | Inspect and clear the water hoses and internal channels inside the laser machine. |
| Alarm persists | The issue lies within the chiller itself—either the pump is not delivering flow, or the internal flow sensor is faulty. | Check for intermittent or absent water flow through the bypass hose. If flow is weak or absent, the pump or internal circulation system may require servicing or replacement. |
The bypass test isolates the chiller from the rest of the cooling loop. If the alarm stops during bypass, the problem is downstream—typically a kinked hose, a trapped air bubble in the laser head's cooling channels, or accumulated debris. If the alarm continues, the chiller's own pump, flow switch, or internal plumbing is the source.
If the water level is sufficient and circulation is confirmed, the alarm may be triggered by overheating—either of the chiller itself or of the coolant. Chillers reject heat through air‑cooled heat exchangers; if airflow is obstructed, the system cannot dissipate heat effectively.
What to check:
Dust filters and ventilation grilles: Inspect the air intake and exhaust grilles on both sides of the chiller. Dust accumulation is common in laser workshops, where fine particles from PET ablation or metal processing are airborne. Clean the filters thoroughly using compressed air or a soft brush. A clogged filter can reduce airflow by 50% or more, directly leading to overheating alarms.
Ambient placement: Ensure the chiller is positioned in a cool, dry, and well‑ventilated location. Avoid placing it near heat sources—such as the laser cabinet exhaust or direct sunlight—or in a confined space where hot air recirculates.
Coolant temperature: If the chiller has a temperature display, check that the coolant temperature is within the normal range (typically 20–25°C). If the temperature is significantly higher, the chiller's refrigeration circuit may be underperforming.
Pro Tip: In some cases, the alarm may clear after cleaning the vents and allowing the chiller to cool for 15‑20 minutes. A simple restart may be sufficient if the unit has reset its thermal protection.
Two additional factors significantly affect chiller performance and lifespan:
Tap water contains minerals (calcium, magnesium) that precipitate as scale when heated, gradually coating the internal surfaces of the cooling channels. This scale acts as a thermal insulator, reducing heat transfer efficiency and eventually causing blockages. Scale buildup is a leading cause of persistent circulation alarms that do not resolve with cleaning.
Recommendation: Use only distilled or deionized water. Replace the coolant at recommended intervals (typically every 3‑6 months, depending on usage). If the system has been running with tap water, consider flushing the cooling circuit with a descaling solution before refilling with proper water.
The chiller ports are clearly marked:
INLET port; connects to the laser device's water outlet
OUTLET port; connects to the laser device's water inlet
Reversing the connections does not necessarily stop flow, but it can push coolant through the laser head in the opposite direction to the intended design. Some laser heads have internal check valves or specific flow paths; reverse flow can reduce cooling efficiency and, in some cases, cause pressure imbalances that trigger the chiller's flow alarm.
The following table provides a quick reference for the diagnostic sequence:
| Step | Checkpoint | Action |
|---|---|---|
| 1 | Water level in reservoir | Top up to green zone with distilled/deionized water |
| 2 | Bypass test (short hose between outlet and inlet) | If alarm stops, inspect laser's water lines; if persists, inspect chiller pump |
| 3 | Dust filters and ventilation grilles | Clean thoroughly; ensure chiller is in a well‑ventilated area |
| 4 | Hose connections | Verify INLET/OUTLET orientation is correct |
| 5 | Water quality | Confirm use of distilled/deionized water; replace if contaminated |
Preventive maintenance is the most effective approach to avoiding chiller alarms:
Weekly: Check water level; top up with distilled/deionized water as needed.
Monthly: Clean dust filters and ventilation grilles; inspect hoses for kinks or wear.
Quarterly: Replace coolant (distilled/deionized water) and inspect internal pump and flow sensor operation.
Annually: Have the chiller professionally serviced—check refrigerant level, compressor performance, and electrical connections.
If all diagnostic steps have been completed and the alarm persists, your laser system may require professional service. Chanxan Laser provides comprehensive technical support and OEM maintenance solutions.
Contact Technical Support| Free solution
Previous: None
Next: Air Pump Failure in Laser Processing Systems – A Complete Troubleshooting Guide